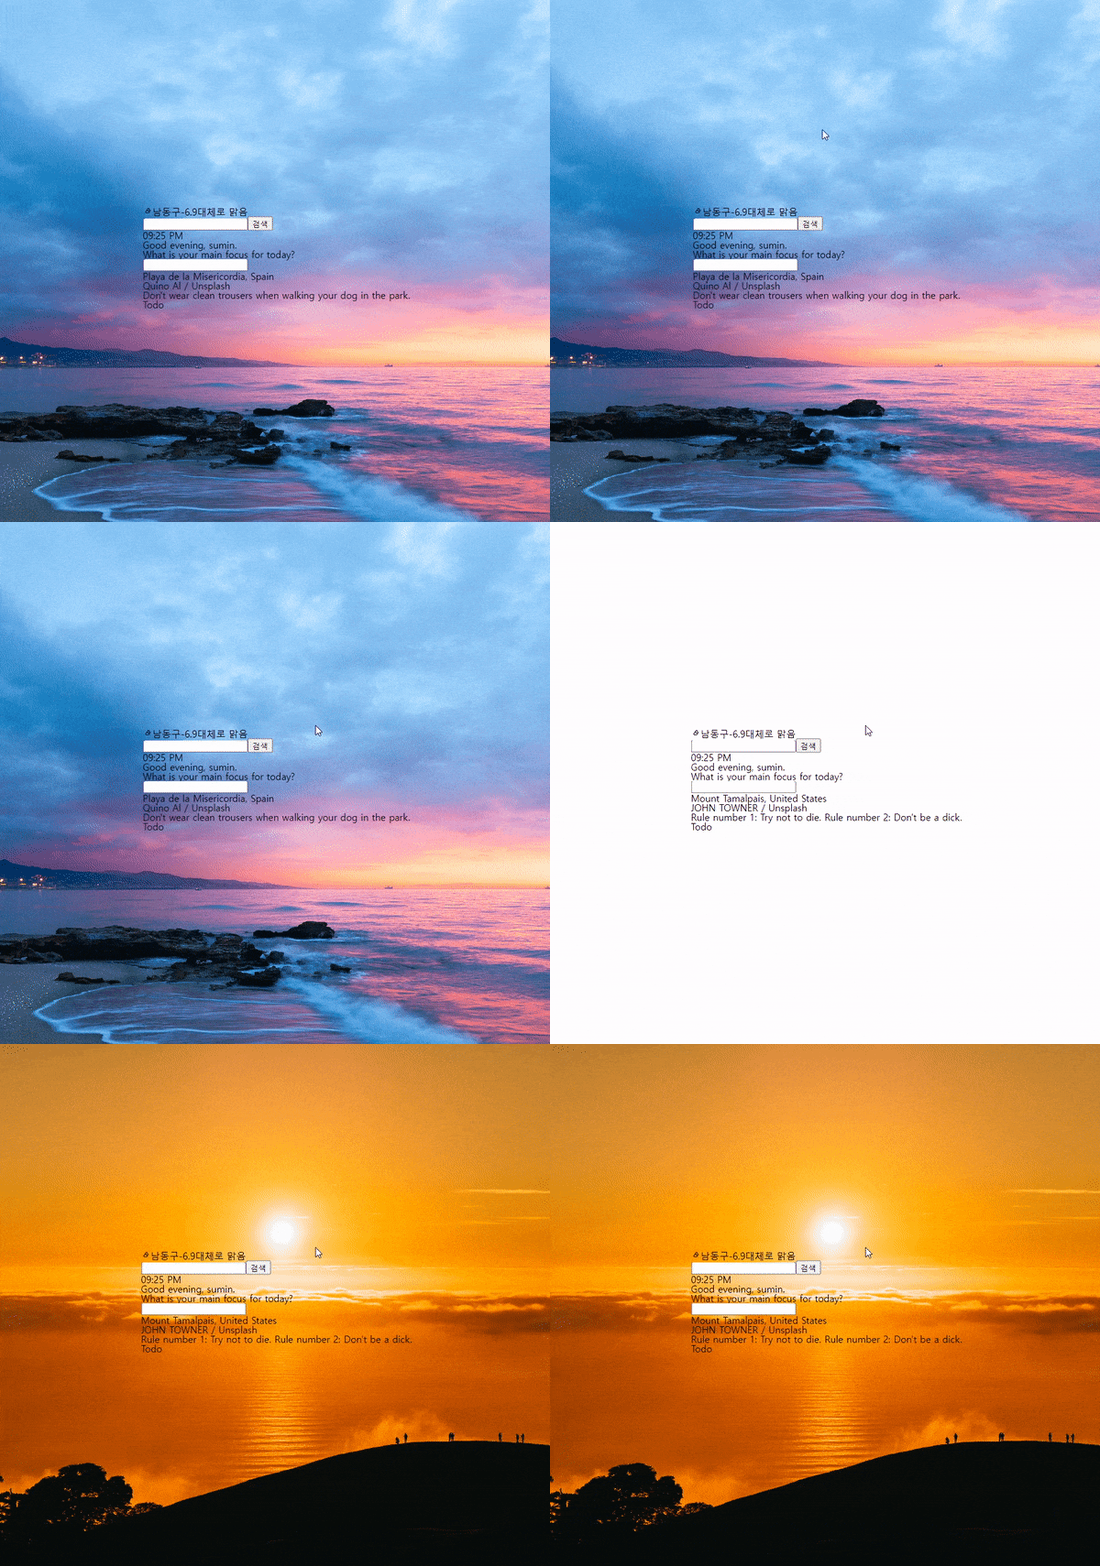
오늘은 AccuWeather API를 사용해서 날씨 데이터를 호출해보려고 한다.
API를 어떻게 호출하고, 호출한 데이터를 화면에 출력해보자.

- Main
// pages/main.tsx

import Weather from "components/main/Weather";
import BackgroundImgInfo from "components/main/BackgroundImgInfo";
import Advice from "components/main/Advice";

const Main = () => {
  return (
      <>
        <div className="header">
          <Weather />
        </div>
        <div className="footer">
          <BackgroundImgInfo />
          <Advice />
        </div>
      </>
  );
};

export default Main;사용할 컴포넌트를 main 페이지에 불러온다.
- AccuWeather API
필자는 현재 날씨 데이터를 받기 위해 AccuWeaher의 API를 사용했다.
기존에는 사용하기 쉬운 OpenWeather API를 이용하려 했지만 받을 수 있는 데이터의 디테일이 부족했다.
그래서 OpenWeather 보다는 사용하기 까다롭지만 상세한 데이터를 받을 수 있는 AccuWeaher API를 사용하기로 결정했다.
사용 방법은 다음과 같다.
a. AccuWeather 홈페이지에서 회원가입을 한다.
https://developer.accuweather.com/
AccuWeather APIs | home
Exclusions, Conditions and Restrictions of License. Specifically excluded from the License grant relating to the APIs and the API Data are any television type uses such as electronic publishing, database transmissions, side band transmissions, cable castin
developer.accuweather.com
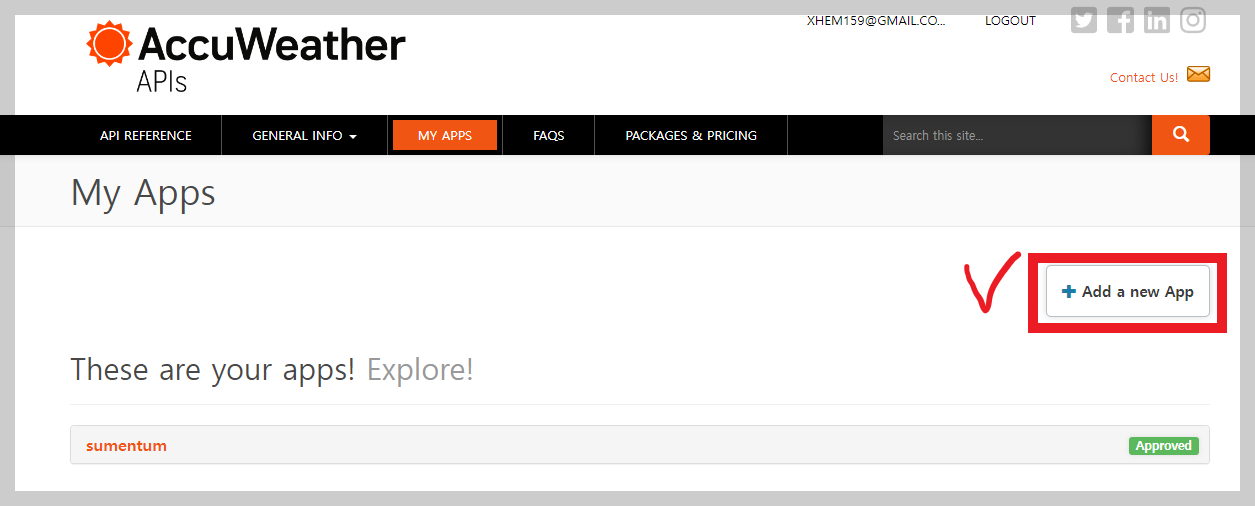
b. My Apps에서 내가 사용할 App을 추가한다.

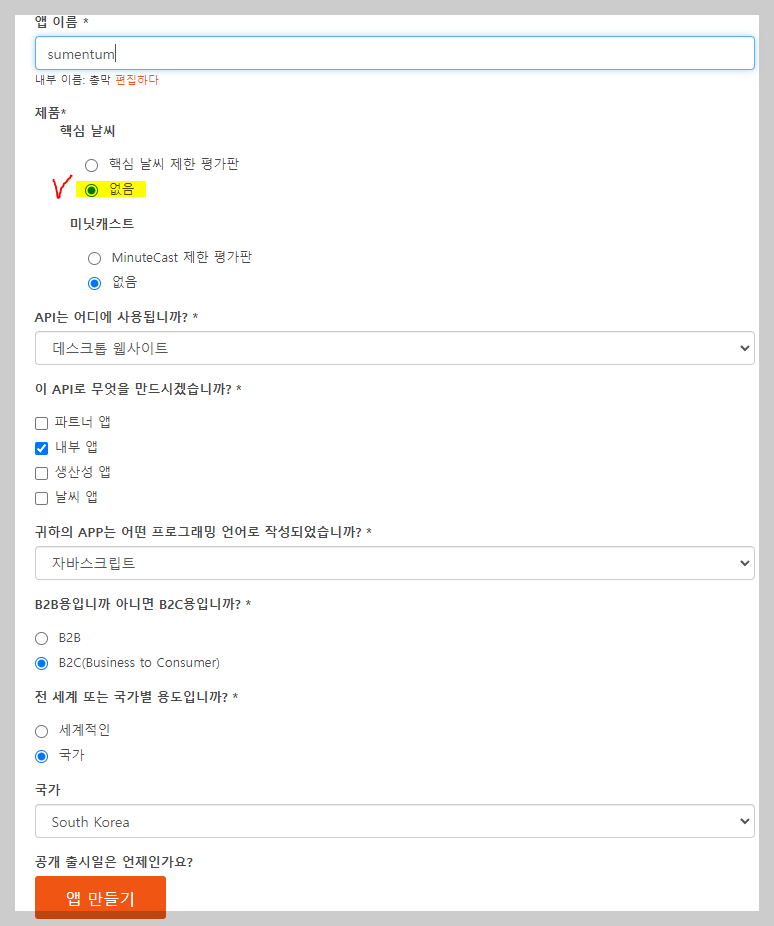
- 버튼 클릭 후 다음과 같이 설정해서 사용했다. ( 여기서 제품의 핵심 날씨는 없음으로 체크해야 필자가 이용할 API 권한이 적용되었다. )

- App이 만들어지면 API Key 값이 부여된다.

c. 부여받은 Key 값으로 API를 사용한다.
필자는 3개의 API를 사용했다. 각각의 API 사용/사용방법 링크를 걸어뒀다.
1. 사용자의 지리적 위치(경도, 위도)를 가져오기 위한 Geolocation API
2. 지리적 위치(경도, 위도)를 입력해서 현재 위치에 대한 데이터를 응답하는 Location API
3. 현재 위치의 날씨 상황을 알려주는 Current Conditions API
순서대로 살펴보자.
- Geolocation API
2번의 Location API를 사용하기 위해서는 경도, 위도를 알아야 한다.
필자는 사용자가 직접 위치를 설정하지 않아도 현재 위치에 따른 날씨를 나타내는 것이 사용자 경험 측면에서 좋을 것 같다고 판단하여 자바스크립트에서 제공하는 Geolocation API를 통해 경도, 위도 데이터를 가져왔다.
API를 요청하면 다음과 같은 json 데이터를 응답받을 수 있다.

응답받은 json의 형태를 확인했으니 위도, 경도 데이터만 가져오는 코드를 작성한다.
// components/main/Weather.tsx

import { useEffect } from "react";

const Weather = () => {
  useEffect(() => {
      // Geolocation API로 사용자의 현재 위치 위도, 경도 데이터 가져오기
      navigator.geolocation.getCurrentPosition(
        (position) => {
            console.log(
                "lat: ",
                position.coords.latitude,
                "lng: ",
                position.coords.longitude
            );
        },
        // Geolocation API 요청 실패시 실행될 Callback 함수
        () => {
          alert("Your location could not be found.");
        }
      );
  }, []);

...
- Location API
위도, 경도 데이터를 얻었으니 Location API로 넘어가 보자.
3번의 Current Conditions API를 사용하기 위해서는 location key 값이 있어야 한다.
해당 Key 값을 가져오는 API가 바로 Location API이다.
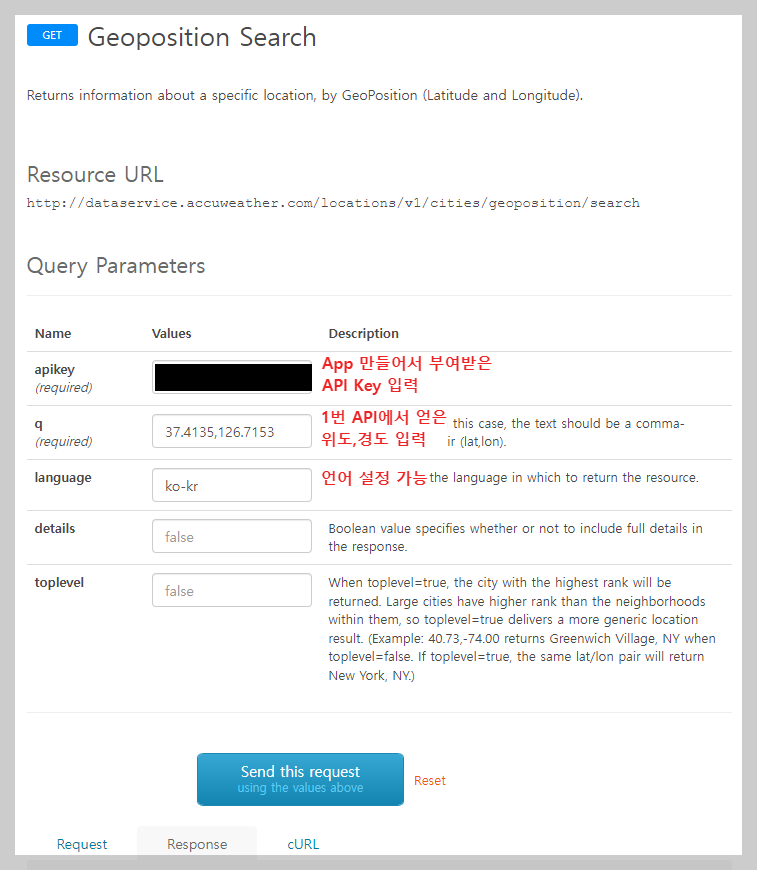
사용 방법은 다음과 같다.

기본적으로 required라고 적혀있는 옵션은 필수로 적어야 하고 나머지는 선택사항이다.
위처럼 입력 후 Send this request 버튼을 클릭하면 아래에 있는 Response에서 응답 결과가 나타난다.

호출에 성공하면 여러 가지 정보가 나오는데 다른 건 필요하면 사용하고, 우리가 사용할 값은 Key와 LocalizedName의 value 값이다.


필자는 '동'이 아닌 '구' 단위로 데이터를 사용할 것이기 때문에 '논현2동'의 ParentCity인 '남동구'의 Key와 LocalizedName 데이터를 가져왔다.
코드에서는 다음과 같이 사용했다.

// pages/api/weatherAPI.tsx

import axios from "axios";

interface GeoPosition {
  lat: number;
  lng: number;
}

export const getLocationAPI = async ({ lat, lng }: GeoPosition) => {
  return await axios.get(
    `http://dataservice.accuweather.com/locations/v1/cities/geoposition/search?apikey=${process.env.NEXT_PUBLIC_ACCUWEATHER_KEY}&q=${lat}%2C${lng}&language=ko-kr`
  );
};


// .env

NEXT_PUBLIC_ACCUWEATHER_KEY = "API Key"
getLocationAPI() 함수를 만들어 Location API를 요청할 때 url 입력에 필요한 위도, 경도를 lat, lng 속성(property)으로 받았다.
api key 값은 .env 파일에서 관리하여 코드에서 key 값이 노출되는 것을 방지했다.
이렇게 만든 Location API 호출 함수를 기존에 작성했던 Weather 컴포넌트에 추가한다.
// components/main/Weather.tsx

import { getLocationAPI, getWeatherAPI } from "pages/api/weatherAPI";
import { useEffect } from "react";

interface LocationData {
    key: number;
    localizedName: string;
}

const Weather = () => {
  const [locationData, setLocationData] = useState<LocationData>();

  useEffect(() => {
      navigator.geolocation.getCurrentPosition(
        (position) => {
          getLocationAPI({
            lat: position.coords.latitude,
            lng: position.coords.longitude,
          }).then((res) =>
              // 응답받은 데이터에서 ParentCity의 Key, LocalizedName를 locationData state 저장
              setLocationData({
                key: res.data.ParentCity.Key,
                localizedName: res.data.ParentCity.LocalizedName,
              })
          );
        },
        () => {
          alert("Your location could not be found.");
        }
      );
  }, []);

...
- Current Conditions API
2번 과정까지 수행하면 우리는 location key 값을 얻을 수 있다.
마지막으로 Current Conditions API를 사용해서 현재 날씨 데이터를 호출하고 페이지에 출력해 보자.

먼저 2번 과정에서 얻은 남동구의 location key 값인 2330425를 아래와 같이 입력한다.

이후에는 2번 과정과 비슷하게 API Key(필수), language(선택)를 입력하고 응답 결과를 확인한다.

호출이 정상적으로 된다면 위와 같은 날씨 데이터를 얻을 수 있다.
필자는 Temperature, WeatherIcon, WeatherText 이렇게 3개의 데이터를 가져왔다.
Temperature는 섭씨 단위인 Metric의 Value 값을 가져왔다.
// pages/api/weatherAPI.tsx

import axios from "axios";

interface GeoPosition {
  lat: number;
  lng: number;
}

export const getLocationAPI = async ({ lat, lng }: GeoPosition) => {
  return await axios.get(
    `http://dataservice.accuweather.com/locations/v1/cities/geoposition/search?apikey=${process.env.NEXT_PUBLIC_ACCUWEATHER_KEY}&q=${lat}%2C${lng}&language=ko-kr`
  );
};

// locationKey를 property로 받아와서 url에 입력
export const getWeatherAPI = async (locationKey: number) => {
  return await axios.get(
    `http://dataservice.accuweather.com/currentconditions/v1/${locationKey}?apikey=${process.env.NEXT_PUBLIC_ACCUWEATHER_KEY}&language=ko-kr`
  );
};3번의 api 호출 코드 또한 Resource URL 주소를 사용하면 된다.
3번 API까지 호출하고 나면 최종적으로 Weather 컴포넌트가 완성된다.
import { getLocationAPI, getWeatherAPI } from "pages/api/weatherAPI";
import { useState, useEffect } from "react";

interface LocationData {
  key: number;
  localizedName: string;
}

interface WeatherData {
  temperature: number;
  weatherIcon: number;
  weatherText: string;
}

const Weather = () => {
  const [locationData, setLocationData] = useState<LocationData>();
  const [weatherData, setWeatherData] = useState<WeatherData>();

  useEffect(() => {
    // locationData를 불러오기 전..
    if (locationData === undefined) {
      navigator.geolocation.getCurrentPosition(
        (position) => {
          getLocationAPI({
            lat: position.coords.latitude,
            lng: position.coords.longitude,
          }).then((res) => {
            const resData = res.data.ParentCity;
            setLocationData({
              key: resData.Key,
              localizedName: resData.LocalizedName,
            });
          });
        },
        () => {
          alert("Your location could not be found.");
        }
      );
    }
    // locationData를 불러온 후..
    if (locationData !== undefined) {
      getWeatherAPI(locationData.key).then((res) => {
        const resData = res.data[0];
        setWeatherData({
          temperature: resData.Temperature.Metric.Value,
          weatherIcon: resData.WeatherIcon,
          weatherText: resData.WeatherText,
        });
      });
    }
  }, []);

  return (
    <div>
      <span>
        <WeatherIcon />
      </span>
      <span>{locationData?.localizedName}</span>
      <span>{weatherData?.temperature}</span>
      <span>{weatherData?.weatherText}</span>
    </div>
  );
};

export default Weather;
※ WeatherIcon
weatherIcon 컴포넌트는 개인적으로 날씨와 함께 아이콘도 보여주고 싶어서 만들었다.
이 코드는 필자처럼 아이콘도 보여주고 싶은 사람들만 적용하면 된다.
사용하기 전에 react-icons 라이브러리를 먼저 install 한다.
$ npm install react-icons// components/main/WeatherIcon.tsx
import {
WiDaySunny,
WiDaySunnyOvercast,
WiDayHaze,
WiDayCloudy,
WiCloud,
WiCloudy,
WiFog,
WiShowers,
WiDayShowers,
WiStormShowers,
WiDayStormShowers,
WiRain,
WiCloudyGusts,
WiDayCloudyGusts,
WiSnow,
WiDaySnow,
WiSnowflakeCold,
WiSleet,
WiHail,
WiRainMix,
WiThermometer,
WiThermometerExterior,
WiWindy,
WiNightClear,
WiNightAltPartlyCloudy,
WiNightAltCloudyHigh,
WiNightAltCloudy,
WiNightAltShowers,
WiNightAltStormShowers,
WiNightAltCloudyGusts,
WiNightAltSnow,
} from "react-icons/wi";
import { useAppSelector } from "redux/hooks";
interface WeatherIconMap {
[key: number]: JSX.Element;
}
const WeatherIcon = () => {
const weatherIcon: any = useAppSelector(
(state) => state.weather.weatherData?.weatherIcon
);
const weatherIconMap: WeatherIconMap = {
1: <WiDaySunny />,
2: <WiDaySunnyOvercast />,
3: <WiDaySunnyOvercast />,
4: <WiDaySunnyOvercast />,
5: <WiDayHaze />,
6: <WiDayCloudy />,
7: <WiCloud />,
8: <WiCloudy />,
11: <WiFog />,
12: <WiShowers />,
13: <WiDayShowers />,
14: <WiDayShowers />,
15: <WiStormShowers />,
16: <WiDayStormShowers />,
17: <WiDayStormShowers />,
18: <WiRain />,
19: <WiCloudyGusts />,
20: <WiDayCloudyGusts />,
21: <WiDayCloudyGusts />,
22: <WiSnow />,
23: <WiDaySnow />,
24: <WiSnowflakeCold />,
25: <WiSleet />,
26: <WiHail />,
29: <WiRainMix />,
30: <WiThermometer />,
31: <WiThermometerExterior />,
32: <WiWindy />,
33: <WiNightClear />,
34: <WiNightAltPartlyCloudy />,
35: <WiNightAltPartlyCloudy />,
36: <WiNightAltPartlyCloudy />,
37: <WiNightAltCloudyHigh />,
38: <WiNightAltCloudy />,
39: <WiNightAltShowers />,
40: <WiNightAltShowers />,
41: <WiNightAltStormShowers />,
42: <WiNightAltStormShowers />,
43: <WiNightAltCloudyGusts />,
44: <WiNightAltSnow />,
};
const executeIcon = (weatherIcon: number) => {
return weatherIconMap[weatherIcon];
};
return executeIcon(weatherIcon);
};
export default WeatherIcon;
https://developer.accuweather.com/weather-icons
AccuWeather APIs | Weather Icons
Exclusions, Conditions and Restrictions of License. Specifically excluded from the License grant relating to the APIs and the API Data are any television type uses such as electronic publishing, database transmissions, side band transmissions, cable castin
developer.accuweather.com
필자는 위 링크인 AccuWeather 홈페이지에 안내되어있는 아이콘 번호와 그림을 기준으로,
직접 react-icons에서 최대한 비슷한 아이콘을 weatherIcon 번호에 따라 호출하도록 코드를 작성했다.
hard coding 적인 요소가 커서 비효율적이지만 구글링에서 좋은 방법을 찾지 못하여 직접 만들어봤다.
필요한 분들은 그대로 가져다가 사용해도 좋고, 혹시 효율적인 방법이 있다면 댓글로 알려주시면 모두에게 도움이 될 것 같다 :)
마치며
배경화면과 조언/명언 API에 대한 내용도 다루려고 했는데 생각보다 글이 너무 길어져서 다음 글에 이어서 작성하려고 한다.
오늘도 글쓰기와 내용 정리에 시간이 많이 소요되었지만, 완성하고 나면 어제보다 성장하고 있다는 느낌이 들어 항상 뿌듯하다. 😁
※
해당 블로그는 개인적으로 작성한 코드를 정리 및 복습을 목적으로 글을 작성하고 있습니다.
글에서 잘못된 부분이나 오타가 있다면 댓글로 알려주세요 :)
부족한 부분이 있더라도 너그럽게 이해해주시면 감사하겠습니다. 🙇♂️
